# hexo-theme-volantis @xaoxuu Writing 2.0-beta4
提示
特别鸣谢本文作者:xaoxuu (opens new window),本文来自官方文档 (opens new window)。
Volantis 主题地址 (opens new window)
# Volantis 主题演示
# 简介
Volantis,原名 Material X。是一款简洁、美观的主题。
# Demo Blogs
本主题将持续更新和维护,你可以在这里查看主题最新的实际效果:👉 https://xaoxuu.com 👈 (opens new window)
# 下载与安装
# 自动安装
- 打开终端输入下面命令安装脚本:
curl -s https://xaoxuu.com/install | sh -s hexo.sh
- 在博客路径打开终端,输入下面命令即可安装主题和依赖包:
hexo.sh i v
# 手动安装
在终端中输入以下命令,下载主题源码到 themes/ 文件夹并安装依赖:
git clone https://github.com/xaoxuu/hexo-theme-volantis themes/volantis
npm i -S hexo-generator-search hexo-generator-json-content hexo-renderer-less
警示
以下内容可能过期,本文仍在更新中。可先前往官方文档 (opens new window)查看。
# 站点配置
提示
如无特殊说明,本部分的配置信息写在博客根目录的 _config.yml 文件中。
# 多语言支持
language:
  - zh-CN
  - en
  - zh-HK
  - zh-TW
# 网站图标
# 简单方式
# 网站图标,更多尺寸等图标请使用import方式批量导入
favicon: https://cdn.jsdelivr.net/gh/xaoxuu/assets@master/favicon/favicon.ico
# 作者头像,会出现在文章标题下方,不同于侧边栏的大头像
avatar: https://cdn.jsdelivr.net/gh/xaoxuu/assets@master/avatar/avatar.png
# 自定义方式
# 全局导入
import:
  meta:
  - "<meta name='theme-color' content='#FFFFFF'>"
  - "<meta name='msapplication-TileColor' content='#1BC3FB'>"
  - "<meta name='msapplication-config' content='https://cdn.jsdelivr.net/gh/xaoxuu/cdn-favicon@19.9.6/browserconfig.xml'>"
  link:
  - "<link rel='shortcut icon' type='image/x-icon' href='https://cdn.jsdelivr.net/gh/xaoxuu/cdn-favicon@19.9.6/favicon.ico' target="_blank">"
  - "<link rel='icon' type='image/x-icon' sizes='32x32' href='https://cdn.jsdelivr.net/gh/xaoxuu/cdn-favicon@19.9.6/favicon-32x32.png'>"
  - "<link rel='apple-touch-icon' type='image/png' sizes='180x180' href='https://cdn.jsdelivr.net/gh/xaoxuu/cdn-favicon@19.9.6/apple-touch-icon.png'>"
  - "<link rel='mask-icon' color='#1BC3FB' href='https://cdn.jsdelivr.net/gh/xaoxuu/cdn-favicon@19.9.6/safari-pinned-tab.svg'>"
  - "<link rel='manifest' href='https://cdn.jsdelivr.net/gh/xaoxuu/cdn-favicon@19.9.6/site.webmanifest'>"
  # script:
# Import
可以在无需修改主题文件的情况下在 head 和 body 中添加各种标签。 meta 和 link 对应 head 中的 <meta> 和 <link> 标签。 script 可以在 body 末尾导入 js 文件。
# 全局导入
import:
  meta:
  - "<meta name='theme-color' content='#FFFFFF'>"
  - "<meta name='msapplication-TileColor' content='#1BC3FB'>"
  - "<meta name='msapplication-config' content='https://cdn.jsdelivr.net/gh/xaoxuu/assets@master/favicon/favicons/browserconfig.xml'>"
  link:
  - "<link rel='shortcut icon' type='image/x-icon' href='https://cdn.jsdelivr.net/gh/xaoxuu/assets@master/favicon/favicon.ico'>"
  - "<link rel='icon' type='image/x-icon' sizes='32x32' href='https://cdn.jsdelivr.net/gh/xaoxuu/assets@master/favicon/favicons/favicon-32x32.png'>"
  - "<link rel='apple-touch-icon' type='image/png' sizes='180x180' href='https://cdn.jsdelivr.net/gh/xaoxuu/assets@master/favicon/favicons/apple-touch-icon.png'>"
  - "<link rel='mask-icon' color='#1BC3FB' href='https://cdn.jsdelivr.net/gh/xaoxuu/assets@master/favicon/favicons/safari-pinned-tab.svg'>"
  - "<link rel='manifest' href='https://cdn.jsdelivr.net/gh/xaoxuu/assets@master/favicon/favicons/site.webmanifest'>"
  # script:
# 主题配置
提示
如无特殊说明,本部分的配置信息写在主题根目录的 _config.yml 文件中。
# 显示「阅读全文」按钮
readmore: true
# 设置幻灯片背景
backstretch:
  position: background  # cover: 封面背景   background: 整个网页背景
  duration: 10000       # 持续时间(毫秒)
  fade: 2500            # 渐变(毫秒)
  is_dark: # true       # 图片是否是暗色的(调整文字为白色)
  images:
    - https://i.loli.net/2020/02/08/HNuVoted2mUxILl.jpg
    # - https://i.loli.net/2020/02/08/dNJyR4LHtarTqPu.jpg
    # - https://i.loli.net/2020/02/08/yXx4GwgZYdi81Qs.jpg
    # - https://i.loli.net/2020/02/08/RP7JpGvWaCYfuB6.jpg
建议
- 要么全部使用浅色图片。
- 要么全部使用深色图片,然后上方
is_dark: true,然后前往source/less/_color.less文件中把@theme_background:设置为深色。
# 设置封面
# page的封面
cover:
  scheme: search    # 后期将会提供多种封面布局方案
  height: full      # full: 首页封面占据整个第一屏幕,其他页面占半个屏幕高度, half: 所有页面都封面都只占半个屏幕高度
  title: Volantis
  subtitle: 'A Wonderful Theme for Hexo 4.2+'
  logo: # assets/logo.png    # logo和title只显示一个,若同时设置,则只显示logo
  search: '搜索文档'
  # 主页封面菜单
  features:
    - name: 博文
      icon: fas fa-rss
      url: /
    - name: 项目
      icon: fas fa-code-branch
      url: projects/
    - name: 归档
      icon: fas fa-archive
      url: blog/archives/
      rel: nofollow
    - name: 关于
      icon: fas fa-info-circle
      url: about/
      rel: nofollow
# 设置导航栏
navbar:
  # 左侧logo区
  logo:
    # 显示图片,使用图片时将不会显示icon和title
    img: # https://cdn.jsdelivr.net/gh/xaoxuu/cdn-favicon@19.9.7/apple-touch-icon.png
    # 显示图标
    icon: fas fa-home
    # 显示标题
    title: XAOXUU
  # logo后面的导航菜单
  menu:
    # 在桌面端显示的导航菜单
    on_desktop:
      - name: 近期
        icon: fas fa-hourglass-half
        url: /
        target: _self
      - name: 分类
        icon: fas fa-folder-open
        url: blog/categories/
        rel: nofollow
        target: _self
      - name: 标签
        icon: fas fa-hashtag
        url: blog/tags/
        rel: nofollow
        target: _self
      - name: 归档
        icon: fas fa-archive
        url: blog/archives/
        rel: nofollow
        target: _self
    # 手机端导航菜单(从右上角的按钮点击展开)
    on_mobile:
      - name: 近期文章
        icon: fas fa-clock
        url: /
      - name: 文章归档
        icon: fas fa-archive
        url: blog/archives/
        rel: nofollow
      - name: 开源项目
        icon: fas fa-code-branch
        url: projects/
      - name: 我的友链
        icon: fas fa-link
        url: friends/
        rel: nofollow
      - name: 主题文档
        icon: fas fa-book
        url: https://volantis.js.org/
        rel: nofollow
      - name: 关于小站
        icon: fas fa-info-circle
        url: about/
        rel: nofollow
  search: 搜索一下   # 搜索框文字
其中 icon 是 fontawesome 图标名,你要显示什么图标,去 fontawesome.com (opens new window) 找免费版的就可以了。
# 毛玻璃与卡片阴影 ^1.5
# 样式
style:
  # 卡片阴影效果
  shadow:
    # 导航栏阴影
    nav: true
    # 卡片阴影和悬浮动画
    # card: true
  # 毛玻璃效果 具体效果调整在: source/less/_color.less
  blur:
    navbar: true
    widget: true
    # body: true
建议
- 有背景图:开启毛玻璃,关闭卡片阴影
- 无背景图:关闭毛玻璃,开启卡片阴影
数值调整:
// 导航栏毛玻璃效果
.nav-blur {
  background: fade(@theme_cardbg, 75%);
  backdrop-filter: blur(50px);
}

// 卡片毛玻璃效果
.body-blur,.widget-blur {
  background: fade(@theme_cardbg, 75%);
  backdrop-filter: blur(50px);
}
# 模块化布局
这里的「布局」是指放置什么模块、顺序如何。对于一个普通文章页面来说,左侧区域称为 body ,右侧区域称为 sidebar ,左侧 body 区域默认上下分为 article 、 comments 两个模块。层级图为:
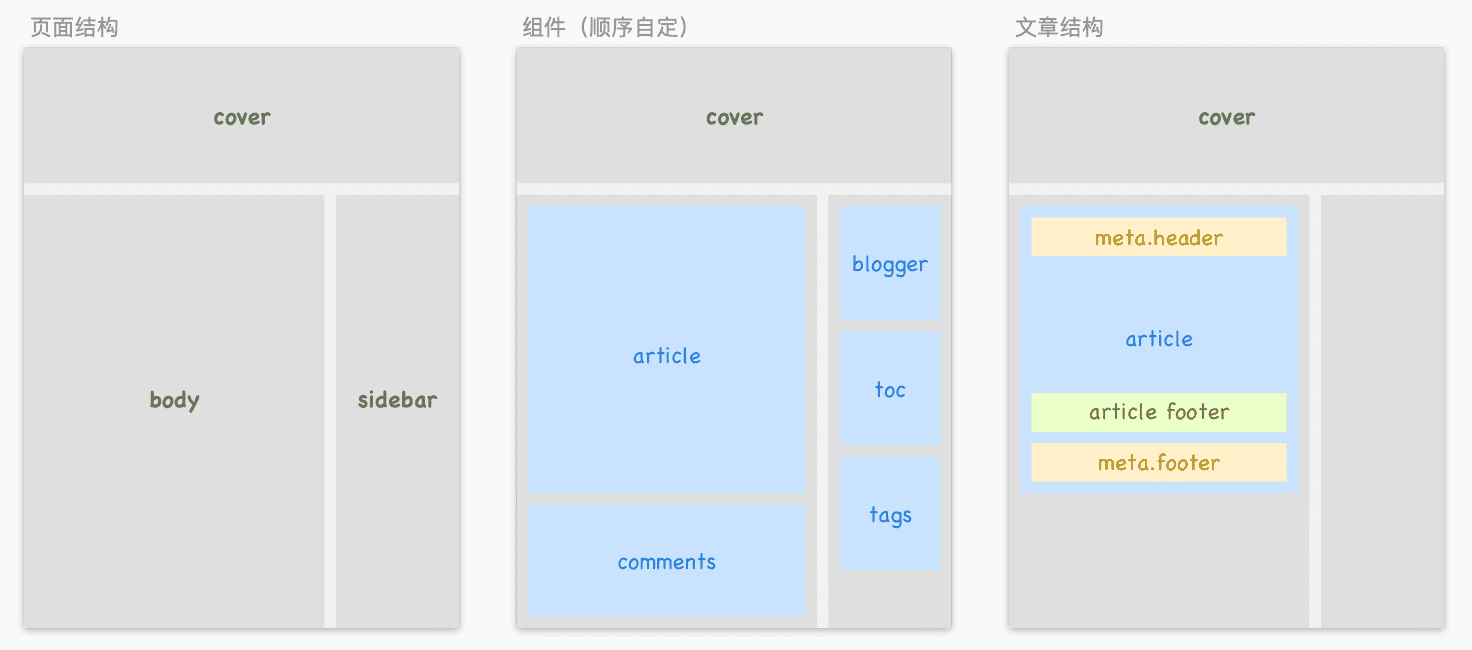
layout:
  # 文章列表(主页、自定义的列表)布局
  on_list:
    # 列表中每一篇文章的meta信息
    meta: [title, author, date, category, wordcount, top]
    # 列表类页面的侧边栏
    sidebar: [blogger, dao_hang, huan_ying, category, tagcloud, tui_jian, qrcode]
  # 文章页面布局
  on_page:
    # 文章页面主体元素,你也可以在页面的Front-matter中设置
    body: [article, comments]
    # 默认的meta信息,文章中没有配置则按照这里的配置来显示,设置为false则不显示
    # 其中,title只在header中有效,music和thumbnail无需在这里设置,文章中有则显示
    # 如果tags放置在meta.header中,那么在post列表中不显示(因为卡片下方已经有了)
    meta:
      header: [title, author, date, category, counter, wordcount, top]
      footer: [updated, tags, share]
    # 文章页脚,自动在每一篇文章末尾添加
    footer: [copyright, qrcode]
    # 文章页面的侧边栏
    sidebar: [blogger, toc, category, tagcloud, qrcode]
  # 其他的页面布局暂时等于文章列表
其中 meta 、 meta.header 、 meta.footer 从 Meta 库 中选取,其他字段值均从 Widget 库 中选取。
# Meta 库
meta:
  # 文章标题
  title: # 暂无配置
  # 文章作者
  author:
    icon: fas fa-user # 如果配置了头像,则不会显示图标
  # 文章创建日期
  date:
    icon: fas fa-edit
    title: '发布于:'
    format: 'll' # 日期格式 http://momentjs.com/docs/
  # 文章更新日期
  updated:
    icon: fas fa-save
    title: '更新于:'
    format: 'll' # 日期格式 http://momentjs.com/docs/
  # 文章分类
  category:
    icon: fas fa-folder-open
  # 文章置顶
  top:
    icon: fas fa-angle-double-up
  # 文章浏览计数
  counter:
    icon: fas fa-eye
  # 文章字数和阅读时长
  wordcount:
    icon_wordcount: fas fa-keyboard
    icon_duration: fas fa-hourglass-half
  # 文章标签
  tags:
    icon: fas fa-tag
  # 分享
  share:
    - id: qq
      name: QQ好友
      img: https://cdn.jsdelivr.net/gh/xaoxuu/assets@19.1.9/logo/128/qq.png
    - id: qzone
      name: QQ空间
      img: https://cdn.jsdelivr.net/gh/xaoxuu/assets@19.1.9/logo/128/qzone.png
    # - id: qrcode # 当id为qrcode时需要安装插件  npm i -S hexo-helper-qrcode
    #   name: 微信
    #   img: https://cdn.jsdelivr.net/gh/xaoxuu/assets@19.1.9/logo/128/wechat.png
    - id: weibo
      name: 微博
      img: https://cdn.jsdelivr.net/gh/xaoxuu/assets@19.1.9/logo/128/weibo.png
    # - id: qrcode # 当id为qrcode时需要安装插件  npm i -S hexo-helper-qrcode
    #   name: QRcode
    #   img: https://cdn.jsdelivr.net/gh/xaoxuu/assets@19.1.9/logo/128/qrcode.png
  # 链接
  btns:
    edit:
      icon: fas fa-edit
      title: 在GitHub上编辑此页
      color: '#888'
    repo: # 源码链接
      icon: fas fa-code-branch
      title: 源码
      color: '#508EF2'
    bug: # BUG反馈链接
      icon: fas fa-bug
      title: BUG
      color: '#FE5F58'
    doubt: # 疑问链接
      icon: fas fa-question-circle
      title: 疑问
      color: '#FFBD2B'
    idea: # 建议链接
      icon: fas fa-lightbulb
      title: 建议
      color: '#3DC550'
    faq: # FAQ链接
      icon: fas fa-comments
      title: FAQ
      color: '#29B1C9'
    feedback: # 反馈链接
      icon: fas fa-comment-dots
      title: 反馈
      color: '#1BCDFC'
# Widget 库
Widget 库中的小部件通常可用于侧边栏、左边主体区域,部分也可用作文章页脚。组件的类别(class)共有以下几种:
| class | 功能 | 适用区域 |
|---|---|---|
| blogger | 博主信息模块 | sidebar |
| toc | 目录 | sidebar |
| category | 文章分类 | sidebar、body |
| tagcloud | 标签云 | sidebar、body、article |
| related_posts | 相关文章推荐 | sidebar、body、article |
| copyright | 版权标识 | article |
| qrcode | 二维码控件 | sidebar、body、article |
| text | 文本控件 | sidebar、body、article |
| grid | 网格控件 | sidebar、body、article |
| list | 列表控件 | sidebar、body、article |
| page | 页面控件 | sidebar、body、article |
一种类型(class)的组件可以创建多个,不能够重名。
# blogger
widget:
  # ---------------------------------------
  # 博主信息小部件配置
  blogger:
    class: blogger
    avatar: https://cdn.jsdelivr.net/gh/xaoxuu/assets@master/avatar/avatar.png
    # title:  标题
    # subtitle: 副标题
    jinrishici: true # 今日诗词。可以设置字符串,加载失败时会显示占位字符串。
    social: true
# toc
widget:
  # ---------------------------------------
  # 目录小部件配置(仅在文章中有效)
  toc:
    class: toc
    display: [desktop, mobile] # [desktop, mobile]
    header:
      icon: fas fa-list
      title: TOC
    list_number: false # 是否显示章节
    min_depth: 2 # H1建议用作网页或者文章的标题,章节从H2开始。
    max_depth: 5 # 由于宽度有限,主题没有针对所有层级进行布局优化,建议文章最多分为:H2/H3/H4/H5四个层级
# category
widget:
  # ---------------------------------------
  # 文章分类小部件配置
  category:
    class: category
    display: [desktop] # [desktop, mobile]
    header:
      icon: fas fa-folder-open
      title: 文章分类
      url: /blog/categories/
# tagcloud
widget:
  # ---------------------------------------
  # 标签云小部件配置
  tagcloud:
    class: tagcloud
    display: [desktop] # [desktop, mobile]
    header:
      icon: fas fa-tags
      title: 热门标签
      url: /blog/tags/
    min_font: 14
    max_font: 24
    color: true
    start_color: '#999'
    end_color: '#555'
# related_posts
widget:
  # ---------------------------------------
  # 相关文章小部件配置
  related_posts:
    class: related_posts # 需要安装插件  npm i -S hexo-related-popular-posts
    display: [desktop, mobile] # [desktop, mobile]
    header:
      icon: fas fa-bookmark
      title: 相关文章
# copyright
widget:
  # ---------------------------------------
  # 版权说明小部件(仅用于文章中)
  copyright:
    class: copyright
    display: [desktop, mobile] # [desktop, mobile]
    blockquote: true # 是否把内容放到blockquote中
    permalink: '本文永久链接是:' # 显示文章永久链接
    content:
      - '这是文章页脚,可以放置版权说明以及打赏图片。<br>博客内容遵循 署名-非商业性使用-相同方式共享 4.0 国际 (CC BY-NC-SA 4.0) 协议'
      - ''
      - permalink
# qrcode
widget:
  # ---------------------------------------
  # 二维码小部件(可用于文章中的打赏,只显示图片,无其他功能)
  qrcode:
    class: qrcode
    display: [desktop] # [desktop, mobile]
    header:
      icon: fas fa-mobile
      title: 手机观看
    height: #64px  # 不设置则自动高度
    fancybox: #true # 是否允许点击放大
    images:
      - https://cdn.jsdelivr.net/gh/xaoxuu/cdn-assets/qrcode/wiki_volantis.png
# text
widget:
# ---------------------------------------
# 自定义组件,仿照如下写法
huan_ying: # 唯一标识,自己命名,建议全英文
class: text # 小部件类型,对应_widget文件夹中的文件名
header:
icon: fas fa-file
title: 文本部件
url: # 点击标题时跳转
content:
- '这是一段支持markdown的文本'
- ''
- haha
# grid
widget:
  # ---------------------------------------
  # 自定义组件,仿照如下写法
  navigation:
    class: grid
    display: [desktop, mobile] # [desktop, mobile]
    header:
      icon: fas fa-map-signs
      title: 站内导航
    rows:
      - name: 近期文章
        icon: fas fa-clock
        url: /
      - name: 文章归档
        icon: fas fa-archive
        url: blog/archives/
        rel: nofollow
      - name: 项目Wiki
        icon: fas fa-landmark
        url: wiki/
# list
widget:
  # ---------------------------------------
  # 自定义组件,仿照如下写法
  wiki-ios:
    class: list
    display: [desktop, mobile] # [desktop, mobile]
    header:
      icon: fas fa-chevron-left
      title: CocoaPods
      url: /wiki/
    rows:
      - name: ProHUD (Swift)
        url: /wiki/prohud/
      - name: ValueX (ObjC)
        url: /wiki/valuex/
      - name: Inspire (Swift)
        url: /wiki/inspire/
      - name: AXKit (ObjC)
        url: /wiki/axkit/
# page ^1.7.0
widget:
  # ---------------------------------------
  # 自定义组件,仿照如下写法
  some_page:
    class: page
    display: [desktop, mobile] # [desktop, mobile]
    header:
      icon: fas fa-chevron-left
      title: CocoaPods
      url: /wiki/
    pid: # 在页面的front-matter中设置一个pid值
    content: excerpt # excerpt, more, content
在页面的 front-matter 中设置一个 pid 值,然后 page 组件中传入对应的 pid 值,便可将页面作为组件。
| content 取值 | 含义 |
|---|---|
| excerpt | 只显示摘要 |
| more | 只显示更多后面的内容 |
| content | 显示全文 |
# 如何新增自定义组件 ^1.7.0
有些组件没有明确具体内容,例如 text 、 list 、 grid 、 page ,这些组件可以称之为通用型组件。
你可以直接在主题配置文件的 widget 相关内容后面新增,也可以单独创建一个文件,为了方便维护,建议使用第二种方式。在 ./source/ 路径下新建 _data 文件夹,然后创建 widget.yml 文件,在文件中写自己的组件。(详见: EasyHexo: 数据文件)
例如:
my_widget_welcome:
  class: page
  display: [desktop, mobile] # [desktop, mobile]
  pid: welcome # 与文章的 front-matter 中的 pid 对应
  content: excerpt # excerpt, more, content
# APlayer 播放器
footer:
  ...
  # APlayer配置 https://github.com/metowolf/MetingJS
  aplayer:
    # 是否启用,注释此项则不加载服务
    enable: true
    # 必选参数
    server: netease   # netease, tencent, kugou, xiami, baidu
    type: playlist    # song, playlist, album, search, artist
    id: 3175833810    # song id / playlist id / album id / search keyword
    # 可选参数
    fixed: false      # enable fixed mode
    theme: '#1BCDFC'  # main color
    autoplay: false   # audio autoplay
    order: list       # player play order, values: 'list', 'random'
    loop: all         # player loop play, values: 'all', 'one', 'none'
    volume: 0.7       # default volume, notice that player will remember user setting, default volume will not work after user set volume themselves
    list_max_height: 340px # list max height
    list_folded: true
# 社交信息
footer:
  ...
  # 页脚社交信息
  social:
    - icon: fas fa-envelope
      url: mailto:me@xaoxuu.com
    - icon: fab fa-github
      url: https://github.com/xaoxuu
    - icon: fas fa-music
      url: https://music.163.com/#/user/home?id=63035382
这些社交按钮也会同时出现在侧边栏头像下方,可以在 Widget 库的配置中设置不显示。
# 第三方插件
提醒
开启过多服务会导致网页加载缓慢、运行卡顿。
# 预加载
鼠标放在链接上就提前开始加载了,开启此项服务时请注意主题配置文件中本地的路径要以 / 结尾。
plugins:
  instant_page: https://cdn.jsdelivr.net/gh/xaoxuu/cdn-volantis@1.7.4/js/instant_page.js
# 文本框打字特效
plugins:
  comment_typing: https://cdn.jsdelivr.net/gh/xaoxuu/cdn-volantis@1.7.4/js/comment_typing.js
# 代码块复制按钮
plugins:
  clipboard: https://cdn.jsdelivr.net/npm/clipboard@2/dist/clipboard.min.js
# 按钮点击涟漪效果
plugins:
  nodewaves:
    css: https://cdn.jsdelivr.net/npm/node-waves@0.7.6/dist/waves.min.css
    js: https://cdn.jsdelivr.net/npm/node-waves@0.7.6/dist/waves.min.js
# 设置网站页脚 ^1.6.4
从 1.6.4 开始,你可以自定义页脚了,通过 footer.layout 告诉主题页脚放什么内容以及顺序如何。
footer:
  # 网站页脚布局,默认支持 aplayer/social/license/info/copyright
  layout: [aplayer, social, license, info, copyright]
  # APlayer配置 https://github.com/metowolf/MetingJS
  aplayer:
    # 是否启用,注释此项则不加载服务
    enable: true
    # 必选参数
    server: netease   # netease, tencent, kugou, xiami, baidu
    type: playlist    # song, playlist, album, search, artist
    id: 3175833810    # song id / playlist id / album id / search keyword
    # 可选参数
    fixed: false      # enable fixed mode
    theme: '#1BCDFC'  # main color
    autoplay: false   # audio autoplay
    order: list       # player play order, values: 'list', 'random'
    loop: all         # player loop play, values: 'all', 'one', 'none'
    volume: 0.7       # default volume, notice that player will remember user setting, default volume will not work after user set volume themselves
    list_max_height: 340px # list max height
    list_folded: true
  # 社交信息配置
  social:
    - icon: fas fa-rss
      url: atom.xml
    - icon: fas fa-envelope
      url: mailto:me@xaoxuu.com
    - icon: fab fa-github
      url: https://github.com/xaoxuu
    - icon: fas fa-headphones-alt
      url: https://music.163.com/#/user/home?id=63035382
  copyright: '[Copyright © 2017-2020 Mr. X](https://xaoxuu.com)'
# 自定义页脚文字
如果你不想显示某些内容,可以在 footer.layout 中删掉。
如果你想显示自定义的一段话或者插入链接,可以在 footer 下增加,例如 br: '<br>' ,代表换行,那么在 footer.layout 中适当位置插入一个 br 就可以增加一行间距。
例如:
footer:
  # 网站页脚布局,默认支持 aplayer/social/license/info/copyright
  layout: [social, br, copyright]
  ...
  br: '<br>'
# 页面配置
提醒
如无特殊说明,本页面的配置信息写在页面文件的 front-matter 中。
# 布局模板
| 取值 | 含义 |
|---|---|
| page | 独立页面 |
| post | 文章页面 |
| category | 分类页面 |
| tag | 标签页面 |
| links | 友链页面 |
| list | 列表页面 |
# front-matter
front-matter 是文件最上方以 --- 分隔的区域,用于指定个别文件的变量。
查看全部取值
| 字段 | 含义 | 值类型 | 默认值 |
|---|---|---|---|
| layout | 布局模版 | String | - |
| title | 标题 | String | - |
| seotitle | 网页标题 | String | page.title |
| date | 创建时间 | Date | 文件创建时间 |
| updated | 更新日期 | Date | 文件修改时间 |
| permalink | 覆盖文章网址 | String | - |
| music | 内部音乐控件 | [Object] | - |
| robots | robots | String | - |
| keywords | 页面关键词 | String | - |
| description | 页面描述、摘要 | String | - |
| cover | 是否显示封面 | Bool | true |
| meta | 文章或页面的 meta 信息 | Bool, Array | theme.layout.*.meta |
| sidebar | 页面侧边栏 | Bool, Array | theme.layout.*.sidebar |
| body | 页面主体元素 | Array | theme.layout.on_page.body |
| mathjax | 是否渲染公式 | Bool, String | false |
| thumbnail | 缩略图 | String | false |
| icons | 图标 | Array | [] |
提醒:没有
seotitle时,以title作为网页标题。
layout:post 时特有的字段:
| 字段 | 含义 | 值类型 | 默认值 |
|---|---|---|---|
| author | 文章作者 | [Object] | config.author |
| categories | 分类 | String, Array | - |
| tags | 标签 | String, Array | - |
| toc | 是否生成目录 | Bool | true |
| top | 是否置顶 | Bool | false |
author
| 字段 | 含义 | 值类型 | 默认值 |
|---|---|---|---|
| name | 作者名 | String | config.author |
| avatar | 头像 | String | config.avatar |
| url | 链接 | String | config.url |
music
| 字段 | 是否必须 | 值类型 |
|---|---|---|
| server | 是 | netease, tencent, kugou, xiami, baidu |
| type | 是 | song, playlist, album, search, artist |
| id | 是 | song id / playlist id / album id / search keyword |
# 独立页面
除了归档页面是自动生成的,其它独立页面都需要手动创建 md 文件。
# 归档页面
归档页面是自动生成的,并且初始化的时候已经生成,路径如下:
# Directory
archive_dir: archives
# 关于页面
请创建 ./source/about/index.md 作为关于页面。
---
layout: page
title: 关于
meta:
  header: []
  footer: []
sidebar: []
valine:
  placeholder: 有什么想对我说的呢?
---

下面写关于自己的内容
# 分类页面
请创建 ./source/categories/index.md 作为关于页面。
---
layout: category
index: true
title: 所有分类
---
# 标签页面
请创建 ./source/tags/index.md 作为标签页面。
---
layout: tag
index: true
title: 所有标签
---
# 列表页面
请创建 ./source/mylist/index.md 作为列表页面。
---
layout: list
group: mylist
index: true
---
结果就是筛选出所有文章中 front-matter 部分含有 group: mylist 的文章。
提醒
上述中的 mylist 只是示例,你可以用任何名字作为一个列表。
# 友链页面
请创建 ./source/friends/index.md 作为友链页面。
---
layout: links     # 必须
title: 我的朋友们   # 可选,这是友链页的标题
links:
  - group: 分组1
    icon: fas fa-user-tie
    items:
    - name:     # 博客名
      avatar:   # 头像链接
      url:      # 博客链接
      backgroundColor: '#3E74C9' # 卡片背景颜色
      textColor: '#fff'  # 卡片文字颜色
      tags: [标签1, 标签2]    # 标签
      desc: 描述文字
  - group: 分组2
    icon: fas fa-user-tie
    items:
    - name:     # 博客名
      avatar:   # 头像链接
      url:      # 博客链接
      backgroundColor: '#3E74C9' # 卡片背景颜色
      textColor: '#fff'  # 卡片文字颜色
      tags: [标签1, 标签2]    # 标签
      desc: 描述文字
---

这里写友链上方的内容。

<!-- more -->

这里可以写友链页面下方的文字备注,例如自己的友链规范、示例等。
提醒
姓名、头像、链接是必填项,其它选填。
# 404 页面
请创建 ./source/404.md 作为 404 页面。
---
layout: page
title: 404 Not Found
body: [article, comments]
meta:
  header: []
  footer: []
sidebar: []
valine:
  path: /404.html
  placeholder: 请留言告诉我您要访问哪个页面找不到了
---

<center>
<p huge>404</p>

<b>很抱歉,您访问的页面不存在</b>

可能是输入地址有误或该地址已被删除

</center>
# 页面元素排列
默认是文章 + 评论:
---
body: [article, comments]
---
如果你想把相关文章卡片显示在评论前,可以这样写:
---
body: [article, related_posts, comments]
---
如果想全局修改,在主题配置文件中的 layout.on_page.body 中设置。
# 文章属性
# 文章置顶
在 front-matter 中设置以下值:
top: true
如果想自定义置顶标签的文字,可以直接设置为字符串,例如:
top: 近期更新
# 文章分类
多个分类有两种关系,一种是层级(等同于文件夹),一种是并列(等同于标签)。
多级分类:
---
categories: [分类A, 分类B]
---
或者:
---
categories:
  - 分类A
  - 分类B
---
并列分类:
categories:
  - [分类A]
  - [分类B]
多级 + 并列分类:
categories:
  - [分类A, 分类B]
  - [分类C, 分类D]
# 文章摘要
在文章中插入 <!-- more --> ,前面的部分即为摘要。
---
title: xxx
date: 2020-02-21
---

这是摘要

<!-- more -->

这是正文
注意
<!-- more --> 前后一定要有空行,不然可能导致显示错位。
# 设置文章作者
由于支持多作者共同维护一个博客,所以可以设置单独一篇文章的作者:
---
author:
  name: 作者
  avatar: https://img.vim-cn.com/a1/d53c11fb5d4fd69529bc805d385fe818feb3f6.png
  url: https://baidu.com
---
# 显示迷你音乐播放器
标题右边显示迷你音乐播放器,支持的字段有: server 、 type 、 id 。
---
music:
  server: netease   # netease, tencent, kugou, xiami, baidu
  type: song        # song, playlist, album, search, artist
  id: 16846091      # song id / playlist id / album id / search keyword
---
提示
实际效果见: https://volantis.js.org/contributors/
APlayer 配置: https://github.com/metowolf/MetingJS
# 显示 meta 标签
文章顶部和底部的日期、分类、更新日期、标签、分享等属于 meta 标签。
顶部的为 header ,底部的为 footer ,取值见主题配置文件中的 meta 库。
---
# 默认的meta信息,文章中没有配置则按照这里的配置来显示,设置为false则不显示
# 其中,title只在header中有效,music和thumbnail无需在这里设置,文章中有则显示
# 如果tags放置在meta.header中,那么在post列表中不显示(因为卡片下方已经有了)
meta:
  header: [title, author, date, category, counter, top]
  footer: [updated, tags, share]
---
像 404、关于页面就可以完全隐藏:
---
meta:
  header: []
  footer: []
---
# 标题右边显示缩略图
---
thumbnail: https://img.vim-cn.com/17/0c7b02722686d1527a1df807dae0794d995860.png
---
缩略图仅在文章列表和文章页面显示,不会在归档页面显示。
# 标签右边显示图标
---
icons: [fas fa-fire red, fas fa-star green]
---
提示
可以通过 red /blue/green /yellow/orange /theme/accent 来设置图标的颜色
theme 为主题色: @theme_main
accent 为链接高亮颜色: @color_text_highlight
# meta 区域显示外链按钮
例如:
---
meta:
  footer: [btns]
btns:
  repo: https://github.com/xaoxuu/hexo-theme-volantis
  bug: https://github.com/xaoxuu/hexo-theme-volantis/issues/new?assignees=&labels=BUG&template=bug-report.md
  doubt: https://github.com/xaoxuu/hexo-theme-volantis/issues/new?labels=疑问&template=question-report.md
  idea: https://github.com/xaoxuu/hexo-theme-volantis/issues/new?assignees=&labels=建议&template=feature-request.md
---
按钮的颜色、图标、标题在主题配置文件中设置。
# 是否要显示封面
如果某个页面不需要封面,可以这样写:
---
cover: false
---
# 引入外部文章
利用 permalink ,搭配自定义的文章作者信息,你可以在文章列表中显示外部文章或者网址,例如:
---
layout: post
date: 2017-07-05
title: [转]如何搭建基于Hexo的独立博客
categories: [Dev, Hexo]
tags:
- Hexo
author:
name: xaoxuu
avatar: https://cdn.jsdelivr.net/gh/xaoxuu/assets@master/avatar/avatar.png
url: https://xaoxuu.com
permalink: https://xaoxuu.com/blog/2017-07-05-hexo-blog/
---

# 显示侧边栏
通过自由设置边栏卡片来删减对应页面的冗余信息,提高有价值的信息在页面中的权重。
如果某个页面不需要侧边栏,可以这样写:
---
sidebar: []
---
某个页面想指定显示某几个侧边栏,就这样写:
---
sidebar: [grid, toc, tags] # 放置任何你想要显示的侧边栏部件
---
# 关闭评论
有两种方法:
---
comments: false
---
或者:
---
body: [article]
---
# 只显示留言板
如果你想创建一个只有留言板的页面:
---
body: [comments]
---
# 标签插件
提醒
EasyHexo 只选取了一部分内容写在这里,详细内容可见 官方文档 (opens new window)。
# 文本属性
<p 属性参数>文本内容</p>
# 彩色文字 ^1.5.2
在一段话中方便插入各种颜色的标签,包括:红色、黄色、绿色、青色、蓝色、灰色。
在一段话中方便插入各种颜色的标签,包括:<red>红色</red>、<yellow>黄色</yellow>、<green>绿色</green>、<cyan>青色</cyan>、<blue>蓝色</blue>、<gray>灰色</gray>。
# 超大文字 ^1.5.2
<p center large>Volantis</p>
<p center small>A Wonderful Theme for Hexo</p>
目前支持的尺寸有: small 、 large 、 huge ,布局有: left 、 center 、 right 。
# 渲染公式(MathJax)
默认是不渲染的,如果文章内有公式,需要在 front-matter 中设置开启。
---
title: 渲染公式(MathJax)
date: 2020-02-23
mathjax: true # false: 不渲染, true: 渲染, internal: 只在文章内部渲染,文章列表中不渲染
---

$$
\begin{equation}
\sum_{i=0}^n F_i \cdot \phi (H, p_i) - \sum_{i=1}^n a_i \cdot ( \tilde{x_i}, \tilde{y_i}) + b_i \cdot ( \tilde{x_i}^2 , \tilde{y_i}^2 )
\end{equation}
$$
$$
\begin{equation}
\beta^*(D) = \mathop{argmin} \limits_{\beta} \lambda {||\beta||}^2 + \sum_{i=1}^n max(0, 1 - y_i f_{\beta}(x_i))
\end{equation}
$$
# 进阶设定
提醒
本部分同样只选取了一些内容,详细内容请见 官方文档 (opens new window)。
# 网站提速
# 加载速度
尝试安装 hexo-all-minifier (opens new window) 插件来压缩文件。
减少不必要的 js 插件,例如字数统计、动态背景。
查找并解决拖慢速度的资源,以 Chrome 浏览器为例:
页面中点击右键,选择「检查」。
在右边的窗口中「Network」选项卡,并勾选「Disable cache」。
刷新网页,查看加载速度慢的资源。
加载缓慢的图片,建议使用 CDN。
加载缓慢的可以不用的 js 插件,建议舍弃。
加载缓慢却必须使用的 js 插件,建议下载并自己上传至
jsdelivr。
# 运行速度
- 访问具有动态特效背景(如雪花、粒子等)的网站时,手机很快会发烫变卡,笔记本很快会风扇狂转并且浏览器提示建议关闭此页面。如果你希望网站有好的使用体验请尽量不要安装这类插件。
- 强烈推荐安装 hexo-offline (opens new window) 插件,初次加载速度不变,后期切换页面和刷新网页速度越来越快。
- 推荐安装图片懒加载插件 hexo-lazyload-image (opens new window)(需同时安装
hexo-fs依赖库)。
# 使用 CDN
# 开启方法
(在博客根目录的 _config.yml )
use_cdn: true
如果你需要对样式进行 DIY,可以只关闭 style 文件的 CDN。
(主题目录的 _config.yml )
info:
  name: Volantis
  version: 1.7.4
  docs: https://volantis.js.org/
  cdn: # 要使用CDN,请在根目录的config文件中写上 use_cdn: true
    css:
      style: https://cdn.jsdelivr.net/gh/xaoxuu/cdn-volantis@1.7.4/css/style.css
    js:
      app: https://cdn.jsdelivr.net/gh/xaoxuu/cdn-volantis@1.7.4/js/app.js
      search: https://cdn.jsdelivr.net/gh/xaoxuu/cdn-volantis@1.7.4/js/search.js
      valine: https://cdn.jsdelivr.net/gh/xaoxuu/cdn-volantis@1.7.4/js/valine.js
# 自定义 CDN
修改对应链接即可。
# 评论系统
提醒
以下配置都在博客根目录的 _config.yml 中。
# Disqus
# disqus评论
disqus_shortname: #你的disqus的shortname#
# Gitalk
gitalk: 要使用哪个请复制到根目录配置文件!
  clientID: 你的clientID
  clientSecret: 你的clientSecret
  repo: 你的repo名
  owner: 你的GitHub名
  admin: [] 至少填写你的GitHub名
clientID 和 clientSecret 的获取方法可自行搜索教程,这里仅简单描述一下步骤:
- 点击 GitHub -> Settings
https://github.com/settings/profile - 点击 Developer settings
https://github.com/settings/developers - 点击 New OAuth App
https://github.com/settings/applications/new - 填写信息:
Application name 随便填,我的是:xaoxuu.com
Homepage URL 和 Authorization callback URL 都写你的网址,我的是:https://xaoxuu.com
可以通过设置 gitalk.id 实现多个页面共用一个评论框。
---
gitalk:
  id: /wiki/volantis/
---
# Valine
leancloud:
  app_id: 你的appId
  app_key: 你的appKey
下面的配置在主题根目录的 _config.yml 。
valine:
  enable: true # 如果你想用Valine评论系统,请设置enable为true
  volantis: true # 是否启用volantis版本(禁止匿名,增加若干贴吧、QQ表情)
  # 还需要在根目录配置文件中添加下面这三行内容
  # leancloud:
  #   app_id: 你的appId
  #   app_key: 你的appKey
  guest_info: nick,mail,link #valine comment header info
  placeholder: 快来评论吧~ # valine comment input placeholder(like: Please leave your footprints )
  avatar: mp # gravatar style https://valine.js.org/avatar
  pageSize: 20 # comment list page size
  verify: false # valine verify code (true/false)
  notify: false # valine mail notify (true/false)
  lang: zh-cn
  highlight: false
其中, placeholder 支持在 front-matter 中设置。
---
valine:
  placeholder: 你觉得xxx怎么样呢?
---
也可以通过设置 valine.path 实现多个页面共用一个评论框。
---
valine:
  path: /wiki/volantis/
---
关于评论
评论前请填好“昵称”、“邮箱”这两栏内容,否则不会收到回复,谢谢!